


- Übersicht
- East India Company
- Pirate Bay
- Privateer
- Designer's Cut
- Battle of Trafalgar
- Collection
- Die Schiffstypen
- Entwickler-Blog
- Videotagebucheinträge
- Modding-Anleitungs-Serie

 09 Oktober 2009:
Modding Teil 6.
This time we learn how to translate the East India Company to your own language.
Weiterlesen » 15 Juli 2009:
Naval warfare, part II.
Lead designer Kim Soares takes the helm of a frigate and shouts: "Port side, FIRE!"
Weiterlesen »
 Halten Sie sich über East India Company auf dem Laufenden: Abonnieren Sie den Newsletter. (Nur in Englisch)
E-Mail-Adresse:
 Abonnieren Sie jetzt den Paradox-Newsletter und erhalten Sie alle aktuelle Informationen von Paradox Interactive (Nur in Englisch).
E-Mail-Adresse:


Modding Instructions Part 4 - Adding a port into the game
Hi all, and welcome to the fourth modding tutorial. My name is Samppa Rönkä and I work as an AI programmer here at Nitro Games. Today I'm going to demonstrate how to add a new port into the game.
Adding a dummy port model
First we'll add a dummy port model to the map. Open this file with your favorite text editor:
Data\Missions\Generic02\generic02_units.dhps
Now go to the very bottom. The last "addUnit" block adds Madras to the game. It should look like this:
addUnit uTOWN_indian
addUnitRootPart pTO_ind3
setUnitIdString uid_town_madras
setUnitSpawnCoordinates s,918.458,-402.004
setUnitAngle 291
setUnitScript generic02_script41
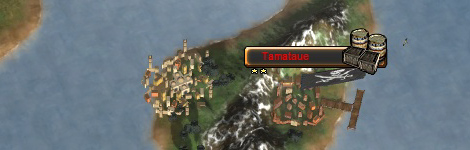
Copy those lines and paste them back to the file just below Madras. We'll call our new port simply "new" and position it to Madagaskar. I hope you all have more imagination here! So, make the following changes and save the file:
setUnitIdString uid_town_new
setUnitSpawnCoordinates s,-220.0,-1025.0
setUnitAngle 65
If you start the game now you should see a new port at Madagaskar. It's just an empty shell though - the game doesn't see it yet.
Linking a port to the game
Open the following file into your text editor:
Data\AI\tradeareas.txt
This file contains different MTI areas and their ports. The structure looks like this:
europe
{
	london
	{
	}

	goteborg
	{
	}

	...
}

africa_1
{
	tabou
	{
	}

	...
}
Ifaty is a port in Madagaskar and it belongs to the africa_5 area. Find ifaty from the tradeareas.txt and make a copy of it's "block" right below it. It will be longish as item pricing at the port needs many lines.
Wherever you see "ifaty", change them to "new". You should change at least the block name, "name" and "unitIdString" parameters. UnitIdString must match with the one you used at the first file. You should end up with something like this:
new
{
	name = str_PORT_NAME_NEW
	mission = Data/Missions/India_03/india_03.dhm

	portCam_x	= -214.0
	portCam_y	= 30.0
	portCam_z	= 7.2
	portCam_beta	= 34
	portCam_dir	= 257.0
	timeofday1	= 12
	timeofday2	= 15
	timeofday3	= 18

	unitIdString = uid_town_new

	lvlTownHall	= 4
	lvlGarrison	= 4

	...and so forth...
}
Save the file and move on to the next chapter!
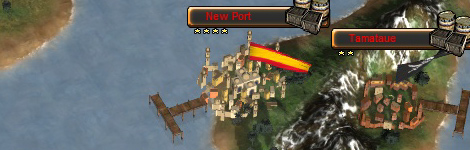
Adding a pier
If you tried to start the game you might have noticed that the pier was missing from the port. In the original game, the piers are terrain objects fixed to a world map. We'll have to create a pier dynamically.
First, paste the following to a new file: (you'll need to do this only once)
part : Soli
{
  id=pPIER_01
  type=Soli
  model="Data/Models/Strategic/Towns/Pier01.s3d"
  name="pPIER_01"
}
Save this as Data\Parts\Solids\Towns\pPIER_01.dhp
Paste the following to a new file: (you'll need to do this only once)
unit : ArmorUnit
{
  name="uPIER"
  unitid=33030303
  bones=none
  animation=none
  scale=3
}
Save this as Data\Units\uPIER.dhu
Then open Data\Missions\Generic02\generic02_units.dhps again and add this below your new port stuff at the bottom of the file.
addUnit uPIER
addUnitRootPart pPIER_01
setUnitIdString uid_pier_new
setUnitSpawnCoordinates s,-265.0,-1050.0
setUnitAngle 335
Now the port has a pier so let's move on to the final chapter.
Final touches
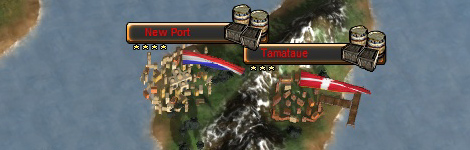
Open the file Data\Locales\en\_strings.txt and add the following line somewhere there: (this will be the actual visible name of the port in game)
str_PORT_NAME_NEW = New Port
Open the file Data\AI\diplomacy.txt and add following: (the number is a port's value in diplomacy)
new = 5000
That's it! Now start the game and go see your brand new port. This may not have been the simplest of things but it's part of the fun and luckily you don't have to do this every day.
In case of any questions or problems see our modding forum.
- Samppa